
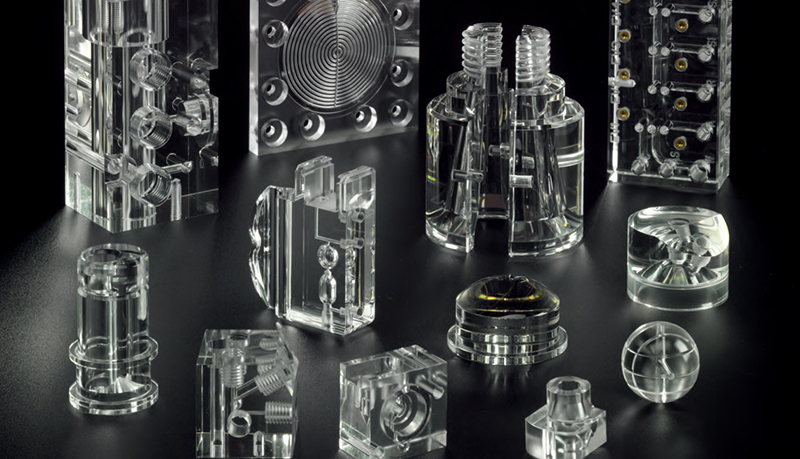
Polymethyl Methacrylate (PMMA), commonly known as acrylic or acrylic glass, is one of the most widely used engineering plastics in modern manufacturing. Renowned for its excellent optical clarity, weather resistance, lightweight properties, and ease of fabrication, PMMA is frequently used in industries such as automotive, medical devices, electronics, architecture, signage, and consumer products.
Despite its versatility, PMMA requires proper cutting techniques to achieve clean edges, dimensional accuracy, and high-quality surface finishes. Improper cutting parameters can lead to chipping, cracking, melting, or poor edge quality, ultimately affecting the appearance and performance of the final product.
This guide explores the most common PMMA cutting methods, recommended tools, and essential CNC machining tips for achieving the best results.
What Is PMMA?
PMMA is a transparent thermoplastic often used as a lightweight and shatter-resistant alternative to glass. It offers excellent light transmission, typically allowing over 90% of visible light to pass through, making it one of the clearest plastic materials available.
Its melting point is about 160°C-180°C , and it is necessary to pay attention to temperature control during processing to avoid melting of the edge of the material. And it is more brittle than PC , so we should pay attention to prevent crack propagation when shearing or drilling.
Common Methods for Cutting PMMA
Several cutting methods can be used depending on the material thickness, required precision, production volume, and surface finish requirements.
Manual Cutting
For thin PMMA sheets, manual scoring and snapping is often the simplest method.
Acrylic scoring knives are used to create a deep groove along the cutting line. Once sufficient depth is achieved, the sheet can be snapped along the score.
This method is suitable for:
- Thin acrylic sheets
- Prototyping
- DIY projects
- Low-volume fabrication
While inexpensive and simple, manual cutting is generally limited to straight cuts and may not provide the precision required for industrial applications.
Saw Cutting
Saw cutting is one of the most common methods for processing PMMA.
Various saw types can be used, including:
- Circular saws
- Table saws
- Band saws
- Panel saws
To achieve clean cuts, manufacturers typically use fine-tooth carbide-tipped blades specifically designed for plastics.
Proper feed rates and blade speeds are important to prevent excessive heat buildup, which can cause melting or edge deformation.
Saw cutting is ideal for:
- Medium-thickness sheets
- Straight cuts
- General fabrication work
- Batch production
Laser Cutting
Laser cutting has become extremely popular for PMMA processing due to its ability to produce smooth, polished edges without additional finishing.
The focused laser beam vaporizes material along the cutting path, creating precise and intricate geometries.
Advantages of laser cutting PMMA include:
- Excellent edge quality
- High precision
- Complex shape capability
- No physical tool wear
- Fast production speed
Laser cutting is widely used for:
- Signage
- Displays
- Decorative panels
- Medical components
- Precision plastic parts
However, laser cutting may not be suitable for very thick PMMA sheets, and thermal stresses can occasionally create micro-cracks in sensitive applications.
Waterjet Cutting
Waterjet cutting uses high-pressure water, often combined with abrasive particles, to cut materials without generating significant heat.
Benefits of waterjet cutting PMMA include:
- No heat-affected zone
- Minimal thermal distortion
- Ability to cut thick materials
- Excellent dimensional accuracy
This method is particularly useful when thermal damage must be avoided.
However, the cut edges may require secondary polishing depending on surface finish requirements.
CNC Routing and Milling
CNC machining is one of the most effective methods for cutting PMMA when high precision and repeatability are required.
CNC routers and milling machines can produce:
- Complex contours
- Precision holes
- Pockets
- Slots
- Engraved features
- Three-dimensional components
Because CNC machining offers excellent flexibility and accuracy, it is widely used for custom PMMA parts and production manufacturing.
CNC Machining Tips for PMMA
Successful CNC machining of PMMA requires careful control of cutting parameters and machining conditions.
Use Sharp Tools
Dull tools generate excessive friction and heat, increasing the risk of melting and edge damage.
Always use sharp cutting tools specifically designed for plastic machining.
Sharp tools produce cleaner cuts and improve surface quality.
Optimize Cutting Speed and Feed Rate
Balancing spindle speed and feed rate is critical.
Excessively high spindle speeds combined with slow feed rates can generate too much heat, causing:
- Melting
- Edge deformation
- Poor surface finish
Conversely, extremely aggressive feed rates may cause chipping or cracking.
Manufacturers should optimize cutting parameters based on material thickness, tool geometry, and machine capabilities.
Ensure Effective Chip Removal
Proper chip evacuation is essential during PMMA machining.
Accumulated chips can be recut by the tool, creating excessive heat and damaging the workpiece surface.
Compressed air systems, vacuum extraction, or specialized chip removal systems can significantly improve machining quality.
Minimize Vibration
Vibration can negatively affect dimensional accuracy and edge quality.
Proper fixturing and secure workholding help reduce movement during machining operations.
Stable machining conditions improve both surface finish and tool life.
Avoid Excessive Heat
PMMA has a relatively low softening temperature compared to metals.
Excessive heat can cause:
- Material melting
- Surface smearing
- Dimensional inaccuracies
- Internal stress formation
Cooling methods such as compressed air or mist cooling may be used depending on the application.
Leave Protective Film in Place
Many PMMA sheets are supplied with protective film on both sides.
Whenever possible, leave the protective film intact during machining to reduce surface scratching and contamination.
The film can be removed after machining is complete.
Common Challenges When Cutting PMMA and How to Overcome Them
Cracking During Cutting
One of the most frequent problems encountered when machining PMMA is cracking. This issue is especially common when processing thin sheets, low-temperature materials, or parts with inadequate support during cutting.
Cracks often develop along the cutting path and may spread quickly through the material, rendering the workpiece unusable.
Typical Signs
Cracking usually appears as visible fractures extending from the cut edge. In severe cases, the material may split completely during machining.
Common Causes
Several factors can contribute to cracking:
- Using cutting tools with coarse teeth that generate excessive cutting forces
- Aggressive feed rates that place excessive stress on the material
- Insufficient workpiece clamping, leading to vibration and instability
- Processing PMMA at low temperatures, which increases brittleness
Recommended Solutions
To minimize cracking risks, manufacturers should use fine-tooth cutting tools designed specifically for plastics. During CNC machining, moderate feed rates generally produce more stable cutting conditions and reduce mechanical shock.
For applications involving thin or delicate PMMA sheets, slightly warming the material before machining can improve flexibility and reduce the likelihood of fracture. Proper fixturing is equally important to prevent vibration and stress concentration throughout the cutting process.
Edge Melting and Thermal Damage
PMMA is highly sensitive to heat. When excessive friction or laser energy is applied during cutting, localized temperatures can rise rapidly, causing the material to soften, melt, or even burn.
This problem is particularly common during high-speed CNC milling and laser cutting operations.
Typical Signs
Thermal damage may appear as:
- Melted edges
- Deformed cut profiles
- Yellow or dark discoloration
- Burn marks along the cut line
- Material buildup on cutting tools
Common Causes
Excessive heat generation often results from:
- Spindle speeds that are too high during CNC machining
- Insufficient feed rates, causing the tool to rub instead of cut
- Excessive laser power settings
- Poor chip evacuation
- Lack of cooling or air assistance
Recommended Solutions
Optimizing the balance between spindle speed and feed rate is essential when machining PMMA. Higher feed rates often help remove heat more effectively by reducing tool-to-material contact time.
When laser cutting, carefully adjusting both power and cutting speed can significantly reduce heat-affected zones and prevent edge scorching.
In CNC applications, compressed air systems, air cooling, or minimum quantity lubrication (MQL) can help dissipate heat and prevent thermal buildup around the cutting area.
Rough Edges and Poor Surface Finish
Achieving a smooth, transparent edge is often one of the primary goals when machining acrylic. However, rough edges and visible machining marks can occur if cutting conditions are not properly optimized.
Poor edge quality not only affects appearance but may also require additional finishing operations, increasing production time and cost.
Typical Signs
Common indicators include:
- Jagged cut edges
- Visible tool marks
- Burr formation
- Cloudy or frosted surfaces
- Reduced transparency along cut sections
Common Causes
- Edge quality issues are often related to:
- Worn or dull cutting tools
- Inconsistent feed rates
- Excessive machine vibration
- Poor tool geometry
- Lack of post-processing
When cutting tools lose sharpness, they tend to tear or scrape the material rather than produce a clean cutting action. This significantly affects the final surface quality.
Recommended Solutions
Using sharp carbide or diamond-coated tools specifically designed for acrylic machining can greatly improve edge quality.
Stable feed rates and proper machine setup help reduce vibration and maintain consistent cutting performance. For applications requiring high optical clarity, slower finishing passes may further enhance surface smoothness.
After machining, additional finishing techniques such as sanding, mechanical polishing, flame polishing, or laser polishing can be used to achieve near-transparent or mirror-like edges.
Conclusion
PMMA is one of the most popular plastic materials used in modern manufacturing due to its excellent optical properties, durability, and ease of processing. Whether using manual cutting, saw cutting, laser cutting, waterjet cutting, or CNC machining, selecting the appropriate method depends on the application requirements, material thickness, and desired finish quality.
For high-precision applications, CNC machining remains one of the best solutions for processing PMMA. By using sharp tools, optimizing cutting parameters, controlling heat generation, and ensuring proper chip evacuation, manufacturers can achieve outstanding dimensional accuracy, smooth surface finishes, and reliable production results.
As CNC technology continues to advance, PMMA machining will become even more efficient, enabling manufacturers to produce increasingly complex and high-quality acrylic components for a wide range of industries.