

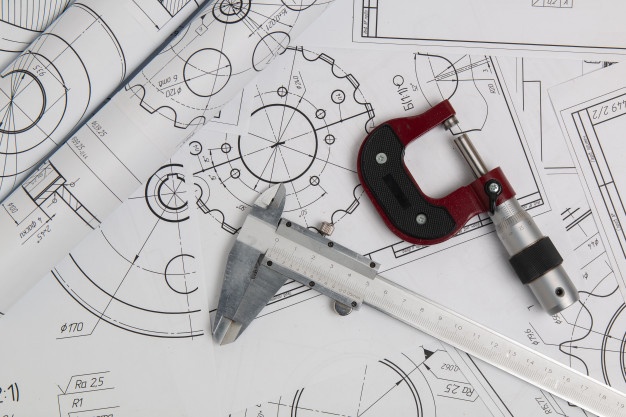
Accurate measurement is very important for CNC precision machining parts. Micrometer is a common measuring tool for machining parts. This article introduces the definition of the micrometer, learns the types and basic components of the micrometer, and more importantly, quickly obtains the readings and measurement methods of the micrometer.
What is a micrometer?
Micrometers are also called micrometer thread gauges. This device can measure small diameters with a maximum diameter of 1.65 mm (plus or minus 0.005 mm). It is used in engineering to ensure that the measurement is accurate to the last millimeter. It is a precision measuring device with a calibration screw. It is mainly used to measure the small distance or thickness between the two faces of mechanical engineering and machined parts. Often used with other measuring instruments (such as dials), vernier calipers and digital calipers. The micrometer is also a useful tool for measuring the apparent diameter of celestial or microscopic objects in a telescope or microscope.
The spiral micrometer is made according to the principle of spiral magnification, that is, when the screw rotates once in the nut, the screw advances or retreats along the axis of rotation for a distance of one pitch. Therefore, the tiny distance moved along the axis can be expressed by readings on the circumference. The screw pitch of the precision thread of the screw micrometer is 0.5mm, the movable scale has 50 equal scales, the movable scale rotates one week, the micrometer screw can advance or retreat 0.5mm, so rotating each small division is equivalent to measuring The micro screw advances or retreats 0.5/50=0.01mm. It can be seen that each small division of the movable scale represents 0.01mm, so the screw micrometer can be accurate to 0.01mm. It is also called a micrometer because it can be estimated to read one more digit, and the millimeter can be read.
Types of micrometers
Outside diameter micrometer: designed to measure the outside of the object, that is, the outside diameter (OD).
Inner diameter micrometer: measure inner diameter or inner diameter (ID)
Depth Micrometer: measure the depth of a hole, groove or seam
What are the Main Parts of a Micrometer
Understand the structure and mechanism of the instrument to better understand and use the micrometer correctly. The main functions of the micrometer are as follows:
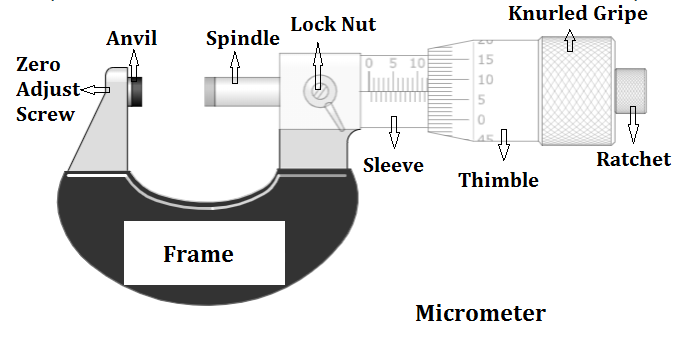
Frame: C-shaped body that holds the anvil and barrel together. The frame is heavy and thick, which makes it difficult to deform under mechanical and thermal stress.
Anvil: It is a part that rests on one side of the frame. In order to hold the object and make a measurement, the spindle moves toward the anvil.
Sleeve/Barrel: A fixed cylindrical part whose frame is fixed on the other side of the anvil.
Lock nut/thimble lock: This rod is used to tighten the movement of the spindle so that it will not move during measurement.
Screw: It is the main part of the micrometer, hidden from sight.
Spindle: The cylindrical component that moves when the thimble is rotated. This will touch the object to be measured and fix it.
Thimble: It is a component that is rotated by the thumb and causes the spindle to move.
Ratchet stop device: a device at the end of the instrument, which is only responsible for applying allowable pressure to the object, and cannot exceed this pressure.
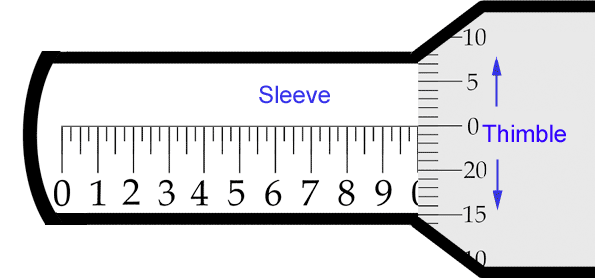
How to Read a Micrometer
- Check the whether micrometer in English or metric, ensure the tool use the same unit as the measurement device
- Rotate your micrometer into a proper position and measure the object
- Read the largest number and count the number of quarters shown on the sleeve first, then read the number is aligned with the datum line on the thimble. Finally, add together these two numbers. The sleeve can be regarded as a ruler with ten numbers, and the space between each number is divided into quarters. One the sleeve, 1 corresponds to .100 inches, one quarter means .025 inches; while on the thimble, each line is equal to .001 inch, for example, 11 is read as 0.011 inches.
How to Use a Micrometer
- Hold the micrometer and support the entire device with the palm of your hand
- Grab the thimble between the thumb and index finger
- Wrap the little finger or ring finger partly inside the frame, do not block the object to be measured
- Hold the part to be measured with the other hand
- Gently clamp the object between the anvil and the spindle
- Twist the ratchet until the object is firmly fixed
- Read the micrometer
The micrometer screw gauge is equipped with a locking rod to prevent movement when reading the measured value. Before turning the thimble or ratchet knob, unlock the lock lever.
Before starting the measurement, make sure to clean the measurement surface with a clean cloth. Particles may interfere with the measurement.
Always make sure to read the scale on the sleeve before the vernier scale. If the order is wrong, the result will be wrong.
When starting the measurement, please start rotating the ratchet knob instead of the thimble. The ratchet knob will ensure that you will not over-tighten the thimble, as this will not only cause false readings, but also damage the instrument.
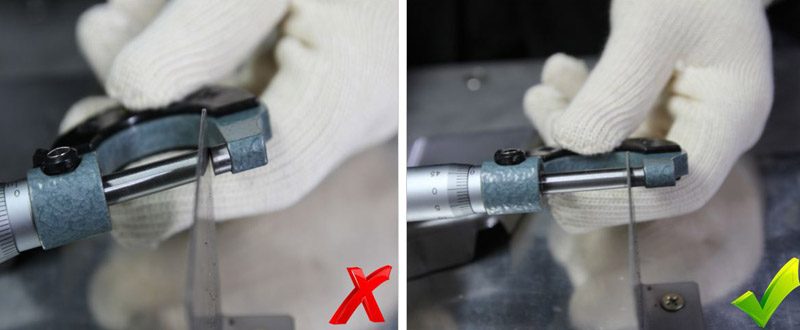
The machinist needs to learn not only how to correctly read the calibration value on the micrometer. In order to use it correctly, they must also learn to hold the part carefully, ensuring that the feature to be measured between the spindle and anvil is properly aligned with the tool frame. This is easy to do with a perfect square plane. Strange geometric shapes become more difficult. The micrometer cannot be used on certain inclined surfaces, so the machinist needs experience to understand how to best use the instrument.
How much pressure should be applied in measurement?
In fact, the pressure for testing standard is very important, it need be well controlled. Another skill that the machinist must master is to know how much pressure is applied between the anvil and the spindle. The ideal situation is to take up any slack or free space so that accurate measurements can be made. However, too much pressure may cause bending or deformation of thin-walled parts. This can also damage precision instruments.
At SANS Machining, we have trained quality personnel and machinists on how to use these equipment. Therefore, we can ensure that the machining process of the parts and the final parts can meet the requirements.
Why is this important for training skilled machinists?
When building machines, accuracy is a very important skill. Making correct analog measurements is critical to achieving accuracy. Remember that accuracy and precision are related, but not the same. Accuracy requires consistency, so we train operators in best practices to produce consistent results.
The correct use of micrometers can ensure the quality of parts, save costs, avoid waste or rework, develop prudent work habits, and enhance the analysis and spatial reasoning capabilities required by senior engineers. This is important because small errors are known to cause a chain reaction. The consequences can be fatal. Therefore, at SANS, we teach all machinists to use micrometers correctly.
At the same time, we also need to unify our entire quality system, testing methods (different testing tools for various parts), quality awareness and standards, and keep in mind the quality level so that we can deliver high-quality CNC parts to customers around the world.
Maintenance Of The Micrometer
First of all: wipe off the dirt and fingerprints on each part with a dry cloth.
If long-term storage and drying without oil, wipe a thin layer of oil with a cloth moistened with anti-rust oil, although this may leave oil stains and spots on the alloy measuring surface, but if it is not used for a long time, do this It will ensure the long-lasting performance of your micrometer.
When storing the micrometer, you must pay attention to the following points:
- When storing, please keep it in a place without direct sunlight, little humidity, good ventilation and little dust.
- Remember to keep it in a storage box, not directly on the ground.
- The most important point: open the space between the two measuring surfaces about 0.1-1mm for storage. At the same time, do not lock the fastening device to prevent malfunction during storage.
please sent Brief detials to more learn easy applicant